
CMH.Tools - A Team Developer Assistance Library
Setup of CMH.Tools
The CMH.Tools library is available for different versions of TeamDeveloper. Currently available are versions: TD4.2, TD5.2, TD6.0, TD6.1. (Further versions possibly on request.).The naming of the files is following the naming conventions which are also used by TeamDeveloper. For example, the library version for TD4.2 is named CMH.Tools42.dll, the edition made for TD6.0 will be named CMH.Tools60.dll.
For the following explanations we will always use XX instead of the exact version numbers, e.g. CMH.ToolsXX.dll.
There is currently no automatic installer for the CMH.Tools setup available. Therefore, a little manual work will be necessary.
Registering the library as a DesignHookDll
After unzipping the archive the library file CMH.ToolsXX.dll has to be copied to a certain place, e.g. the program directory of TeamDeveloper. The place can be any place in the file system, but the following instructions use this as the place of installation.To let the TeamDeveloper IDE directly load the library when starting, the library needs to have an entry at a certain place in the Windows registry database. The easiest way to achieve this, is to use the file CMH.ToolsXX.reg which is provided in the zip archive. It simply can be excuted with a double click, but at first you need to assure the correct path settings according to the individual installation paths.
For those, who want or need to create this entry by hand, the registry key in question is:
HKEY_CURRENT_USER\Software\Unify\SQLWindowsXX\DesignHookDll
This key must contain a character string named CMH.ToolsXX, the value is the name and complete path to the library.
Now, with the next start of the TeamDeveloper IDE, the library CMH.ToolsXX.dll will be automatically loaded. Also the first tool, CodeJumper, will be instantly active.
The other two functions, MassFinder and ClassMate need to be set up first, in order to be available.
Setup MassFinder
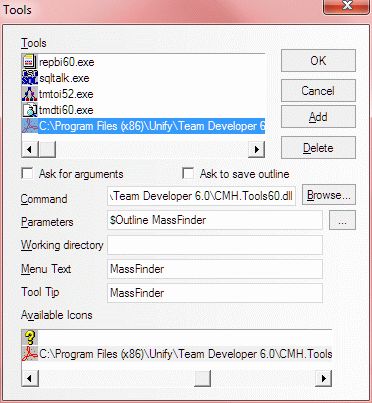
Inside the IDE, under menu "Tools"/"User Tools", create a new tool with the "Add"-button.Write into the datafield "Command" the name and complete path of CMH.ToolsXX.dll, this can also be done with some mouse clicks after clicking the "Browse..."-button.
The datafield "Parameters" needs to contain the values "$Outline" and "MassFinder" (separated with a blank character).
The fields "Menu Text" and "Tool Tip" should contain again "MassFinder", this is the string to be shown in the Tools menu afterwards. That's all.
Setup ClassMate
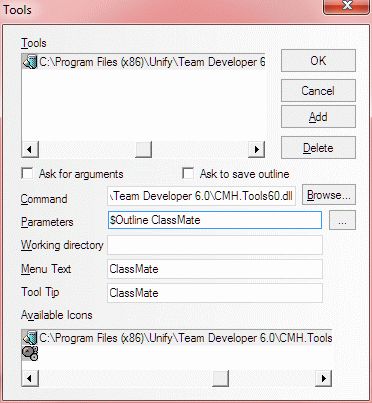
The approach is exactly the same as for the MassFinder setup. However, the datafield "Parameter" must contain the value "$Outline" followed by the string "ClassMate", additionally the fields "Menu Text" and "Tool Tip" should be filled with a text like "ClassMate".The whole thing will be looking like this:
Toolbar Buttons
In order to have these functions easily accessible via toolbar buttons, one solely needs to activate the toolbar "Tools" in the dialog under menu "Tools"/"Toolbars...".The Functionalities In Depth
MassFinder
The MassFinder is representing a sophisticated search function, which lists its results to the IDE's output window.The resulting items are displayed with their complete Outline paths (similar to the information displayed on the IDE's status bar). For included code items the output will be prefixed with the name of the library file.
Only one mouse click on a result item in the output window and one will get the corresponding code positions highlighted and displayed in the editor view.
How to use it:
In order to use it, this function must have been set up in the Tools/User Tools area of the IDE. See section "Setup" for assistance.
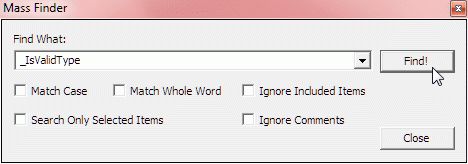
Using the menu or the toolbar button, MassFinder's search dialog will be displayed. Here one can enter the desired search term and after hitting the "Find!" button, the search will be started.
The checkable options "Match Case", "Match Whole Word", "Ignore Included Items", "Search Only Selected Items" and "Ignore Comments" have the same meaning as the options of the search dialog provided by the IDE, so they propably don't need any further explanations.
Search Term History
MassFinder is able to store up to 20 recent search terms, these can be selected from the list of the Combobox, which in fact is the search field. These terms are stored even if the IDE has been shut down.
Additionally, the search term history is available for all currently open instances of the TeamDeveloper IDE! Each time the MassFinder search dialog is activated, the list of search terms will be actualized.
This means, if you are searching for a certain term inside one IDE, and then switch to another open instance of the TeamDeveloper IDE and click on the MassFinder dialog or open it, the new search term is also available here.
ClassMate
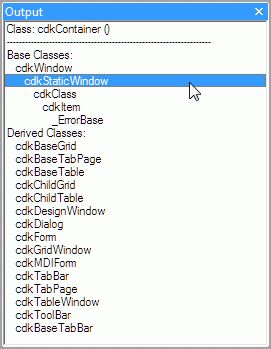
This function is intended to get a quick overview of origin and use of a certain SAL class. For the class in question, all base classes and classes derived from that class are displayed in the IDE's output window.How to use it:
In order to use it, this function must have been set up in the Tools/User Tools area of the IDE. See section "Setup" for assistance.
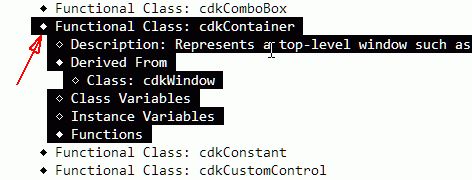
Inside the outline, you must highlight the complete definition of the class in question, this means the diamond of the line containing type and name of the class:
Now hit the menu item or the toolbar button for ClassMate and you'll get results displayed in the output window.
A mouseclick on one of the resulting classes in the oputput window brings the corresponding class definitions inside the coding outline into view.
CodeJumper
The starting point for this symbol search is the current position of the edit cursor. The code place in question must be in real edit mode. If the whole line including the line's diamond is selected, the search can't be activated.The symbol used for the symbol search is the one where the selection starts. Examples:

With a hit of the F2 key, the function now starts with the search for the selected symbol. If the correct declaration was found in the current source code, it will be highlighted and brought into the visible view.
The search will be performed respecting the particular scoping rules as well as potential hirarchies of class derivation. Only latebound calls can't be resolved correctly, since the actual implementations are resolved only at runtime.
The search is not restricted to the contents of the current code view, but spans always the whole code loaded into the outline.
Jump History
This function keeps a list of all single jumps. With hitting the Ctrl-F2 key combination, CodeJumper is able to jump back to the particular preceding code positions.
When finally reaching the original code position, thus the position where the first symbol jump started from, the function also restores the original code view.